Showing posts with label caroline. Show all posts

Monday, May 21, 2012

How to Enhance Blue Eyes With Makeup

Hello, ladies!  It's Caroline again.  Today I'm going to talk about how to make blue eyes stand out with your makeup.  The other girls might be putting up posts on how to enhance their eye colors as well, with either clothes or makeup, so stay tuned for those!

Let's get right down to it.  I'll just say, though, that as a general rule, you should use the color that makes you feel prettiest.  If you wear green eyeshadow every day and it makes you feel confident, keep wearing that green eyeshadow, and don't worry about makeup "rules."  But if you're not sure what colors to buy and you want to make your eyes brighter and more vivid, these tips might help you out.

Myth:  Blue eyeshadow makes blue eyes pop.

Fact:  Warm eyeshadows (brown, gold, pink, etc.) make blue eyes brighter and altogether more... Boom.

The issue with blue eyeshadow is that it can overwhelm your eye color.  A stark, bright blue might make your blue eyes look a bit dull because it might be more vivid than the color of your eyes, and a dark blue might wash out your eyes a bit.  You can always use dashes of blue, whether in your eyeliner or a bit in your crease, if you feel you've found the perfect blue for your coloring, but warm colors are generally the best for noticeable enhancement.


Blue Eye Color Enchancement

Blue Eye Color Enchancement by jabberbabywokky featuring a shimmer eyeshadow


Your best bet is to buy eyeshadow palettes that feature browns, golds, yellows, pinks, and flesh toned colors.  Here's why:

via
If you look on the color wheel, oranges and yellow toned colors are directly across from blue toned colors.  Generally, colors opposite each other on the color wheel serve to bring each other out beautifully because of the stark contrast.  Blue is a very cool color, and so warm colors make it pop.

Here is a quick picture tutorial on how I enhance my eyes.  Mine are a grey-ish blue, and I like to use dark browns and golds.  I rarely use pinks because I'm very fair-skinned and they tend to make me look tired.

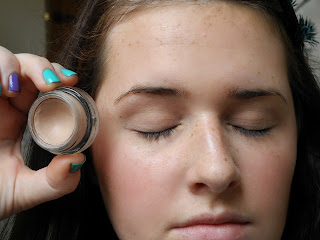
{Step One} Prime the eyes.  I used MAC's Paint Pot in the shade Painterly.

{Step Two}  Put a pearly color on the brow bone to lift and highlight your brows.

{Step Three}  Apply a wash of gold all over the lid up to the crease.  I'm using a deep, true gold from a Sephora palette.

{Step Four}  Using a small blending brush, apply a light, or medium, brown shadow in the crease.  I am using a brown color from a Tarte palette.

{Step Five} Using a pencil brush, or any brush with a point, apply a slightly darker brown shadow to your crease at the outer edge, blending it inwards from that outer edge.  The brown I'm using is from the same Tarte holiday palette as the one before.  This just gives your crease a bit more definition.

 {Step Six}  Blend everything out with a taupe color or something close to your skin tone. Again, I'm using a taupe from the Tarte palette.

 {Step Seven}  Apply a brown eyeliner to your lower lash line, as close to the waterline as possible without actually putting it on your waterline.  

{Step Eight}  Using the dark brown that you put in your crease, or the lighter brown for a more natural effect, smudge out the liner a little bit.

 {Step Nine} Using your finger, apply a very bright, shimmery white or pearl shade to the very center of your lid, and a little in your tear duct area.  This will make the look more fresh and perfect for day time wear.  If you're going out at night, skip putting this color on the middle of your lid and stick to just putting it in your tear duct area.


{Step Ten}  Curl your top lashes and apply your favorite mascara to the top and bottom eyelashes.


And now you're done!  Finish off with a bit of pink lip gloss (I find pink lip gloss helps make my eyes stand out, too) and you're good to go!

Products Used:
1. Painterly Paint Pot - MAC
2.  Cream shimmer shadow from a Holiday Palette - Tarte
3.  Mix of the two gold shades from this Palette - Sephora
4.  Both dark brown colors from the Holiday Palette - Tarte
5.  Long-Lasting Natural Eyeliner - Tarte
6.  (From the bottom up) Sigma E35 Travel Brush, MyGlam blending brush, Sigma Pencil Brush, Sephora Eyeshadow Brush, Sephora Eyeliner Brush
7.  Coup de Theatre 2 in 1 Mascara - Bourjois
8.  Nail Polish in Beauty Bandit - H&M
9.  Nail Polish in Bella's Choice - H&M
10.  Maybelline Lipstick in the shade Pink & Proper, and Stila lip gloss in the shade Blush


I hope this tutorial helped out you blue-eyed girls!  Let me know what you think, and if you have any questions, I'm happy to help you out in the comments section below.  

Love, 
Caro

Sunday, May 20, 2012

Better Than False Lashes - Too Faced Mascara

Hey, it's Caro!

I was sent a product to review, and I've used it enough to give an accurate one.  TooFaced (one of my favorite makeup brands) sent me their brand new Better Than False Lash System.  Let me just go ahead and say that I'm not being paid to be nice about it, nor am I being paid to review it all.  They were just kind enough to send it over and see what I have to say.

So, here's the skinny on the Better Than False Lashes.  It's currently only available at Sephora, and you can find the link by clicking "via" under this little photo:


via


As you can see, it's a two piece system.  It has an activating base and top coat, and the nylon fibers.

     ///First, you apply the activating mascara as a base.  I apply it pretty thinly.  

     ///Second, you apply the fibers just as you would with regular mascara.  It's a really cool concept!  It looks like cotton fibers in the tube, and it sticks to the base mascara.

     ///Third, apply the activating mascara over the fibers to cover the whiteness and fill everything out.

Pretty easy, right?  Much easier than putting on real false lashes!


{Pros}  
  • Thickens the lashes beautifully 
  • Is not clumpy, surprisingly, even though it puts fibers on your lashes.  Looks very natural.
  • Lengthens by a LOT.
  • Comes off easily with soap and water/eye makeup remover.

{Cons}
  • Takes a long time to dry
  • A bit sticky feeling on the eyes.  However, actual false lashes, in my opinion, are even more annoying to the eyes, and you don't have to worry about them falling off!
  • It's pretty pricey!

I would definitely say this is worth the money!  They would be wonderful if you're in a hurry but want a more dramatic eye than your usual, and they're more comfortable than real falsies.  

Have a great day, ladies!

Love,
Caro

Monday, May 14, 2012

Hair How-To: Twisted Tiara

Hola hola hola!  It's Caroline.  I'm currently in the process of growing out some super awkward bangs, and so I rarely wear them down.  Because of this, I've had to come up with some cute ways to hide a bobby pin without having the shortest bits of bang falling in my eyes!

This one is my personal favorite, other than just a French braid.  I like to call it the twisted tiara because it's raised up from the scalp and looks a bit like a crown.  And also because who doesn't love alliteration?

     {Step One}
Starting at your part, lift up two pieces of hair and do one twist.


     {Step Two}
Pick up another strand of hair from your hairline and add it to the front piece.  


     {Step Three}
Twist that front piece and the new strand backwards and over the back piece.  Your back piece is now your front piece.


     {Step Four}
Repeat Step Two and Three over and over until you think you're done.


     {Step Five}
Grasp the two pieces and twist them together into one, and push them against your scalp so the French Twist you've just created gets a bit of volume.


     {Step Six}
Take a bobby pin.  Push it through the end of your twist from underneath and twist/push it in until it feels secure to you.  You can add more bobby pins throughout the "tiara" if you feel some places are loose.


Hit that baby with some hairspray and you've hidden your bangs away for the day!  This is great for summer, too, because it's fast (once you get the hang of it) and looks great with beachy waves.  Or with just plain ol' fresh from sleep lazy butt I just don't care hair.


Happy hair-days to you all.

Love,
Caro
          

Saturday, March 17, 2012

Hunger Games- Capitol Makeup

Finally got myself into gear and cranked out this video!  I had it filmed, but the editing is the hardest part.

Sorry for all the delays, y'all!  School.  It's no joke.

So, here we have Capitol makeup!  The people in the Capitol go nuts with their makeup, only caring about the trends and not about being actually, well, attractive.  They wear garish colors and have nutty tattoos.

Naturally, doing this makeup was really fun.  However, removing it was an absolute mess...


And I know.  The thumbnail is super hot.  Don't be jealous.  ;)

Why I post this craziness is beyond me, but I hope you like it!  I think it'd be a fun Halloween makeup or something.  Enjoy!

Tuesday, February 14, 2012

Choose my color! ***Poll now closed***

Hey everyone, it's Caroline again!

I've gotten quite bored of my hair color.  At this point it's just a very dark brown with brassy undertones.

Because I'm indecisive, I can't think of what color I should get next!  So I'm enlisting the help of all of you (dressing room door girls included)!

I've made a poll to give you some idea of what I would generally go for.  Choose one and vote, and I'll do my hair in the highest voted color.  I thought this would be a fun way to make the decision and involve our readers, since we love you all so much!

I don't want anything crazy.  I've done ombre before (where the hair is darker at the top and fades to slightly lighter at the bottom) and it's gorgeous, and I'd consider it again.  I've done highlights, and I've done slightly lighter browns.  If you go to my info page up above, there's a link at the bottom to all of my posts.  You can look at pictures I've posted of me to get an idea of what would be best for my skin and coloring, etc.

Now, here we go!  I trust you guys, and I'm excited to see what the results are!  Once I dye it, I'll let you know and probably do a tutorial, since I prefer to dye my hair at home.

Pick from the pictures below that correspond to a poll number, and vote away!

**Disclaimer:  Just because I post a picture of a certain celebrity/model doesn't mean I necessarily endorse that person, I just dig their color.**


((Color ONE))
via


((Color TWO))
mine would be slightly darker and less bleachy/yellow.
via
((Color THREE))

via


Choose away, my friends!  I love all three colors, so I'm up for any of them.

Poll closes at 11 AM EST on Thursday.  :)


***POLL NOW CLOSED***

Thanks for your votes! Results in a while. :)

Monday, January 9, 2012

A haul. Because I like to talk and I like to shop.

Hello, everyone!  I've got another video for you (I'm on a roll with this new camera I have).

It's a haul.  I love to watch hauls more than almost any kind of YouTube video.  Don't ask me why because I wouldn't be able to tell you.  I always get excited when I see them in my YT subscription box.  So I talked to the other girls and they agreed that I should do a haul since I have some recent gifts/purchases!

Heeeere we go!  And I made an attempt to be a little more me and not look depressed like in the last few videos.  The camera makes me really quite nervous.


And the lighting shifts a lot during the video, but that's because it went from being sunny outside to being stormy and I can't afford professional lighting.  So.  Yeah.

Have you bought/been given anything recently that you're super excited about?

Hope you have a fantastic day!

Saturday, December 31, 2011

French Makeup

Hey!  It's Caroline. I've decided that the French style is my absolute favorite.

The French girls look like they just rolled out of bed, threw things on, and left.  There's nothing too "done" about their look, and yet they still look elegant and absolutely stunning.  

Today I filmed a tutorial on the laid back French makeup.  It's all about dewy, clear skin, a slight bit of color to the face, smoked out and messy shadow, dark lashes, and a "bitten" lip look.  

I hope you enjoy!  This was my first time trying to make a real makeup tutorial, so let me know what you think... I'm new to this.  I might do a voiceover next time instead of slides, but we shall see.  If you have any questions about the application, ask me in the comments below and I'll respond!

Happy new year!


-Caro

Monday, December 5, 2011

Natural Contouring


Sup, people?  It's Caro.  Contouring is tricky business!  It's hard to get that defined face shape we like, but I'm going to do my best to show you how and still look natural.

If you look at the pictures above, you can't really see the contouring.  That's the point!  Beware muddy brown lines under your cheekbones.  That may make your cheeks look prominent, but it will also make you look like you don't really know what you're doing.  We're young.  Natural, glowy finishes are what we want.

So I'm going to take these pictures and edit them to show you exactly where I put my bronzer, highlighter, and blush.  You'll be surprised!


Attractive, right?  I know.  Hot.

Anyway, this is just to show you roughly where I put my contouring.

Step 1:  Take a bronzer a few shades darker than your skin (cream bronzer is the most natural) and apply it under the cheekbones, right above the jaw line, down the sides of the nose, and up around your forehead down into your temples.

Step 2:  Use your favorite highlighter (shimmery ones are my personal favorite) and put it on the tops of your cheekbones, on your chin, on the bridge of your nose, on the center of your forehead, and right at the top sides of your nose.  You can even put a little dab on your cupid's bow above your lip if you're into the plump lip look.

Step 3:  If you're using cream products, blend out with a bit of your foundation (but if you do this, don't put on a whole face of foundation first.  Start with the contouring and THEN blend with your foundation).  If you're using powders, dust a bit of translucent powder onto a stiff kabuki brush and just blend, blend, blend.  For difficult areas, you can use your fingers to really work it out.

Step 4:  Use a pink blush and lightly blend it onto your cheekbones.  Don't smile and put it on the apples of your cheeks, because this messes with the shape we're creating.  Just sort of blend it into the area where the highlighter and bronzer meet.

And that's it.  If you go all out, this can be time consuming.  But the more you do it, the quicker you get.

Good luck!  Comment below if you have any questions and I'll be sure to answer.  Just.... don't leave the house with brown stripes all over your face and tell everyone I told you how to do it.  BLEND, BLEND, BLEND!!

Love,
Caroline

(And just for fun because I'm a fangirl)

Saturday, October 29, 2011

Flattering Trends Part 3: Chunky Knits

Sup? It's Caroline. I was gonna do a Halloween tutorial, but I gave up.  I don't have the right tools for filming my costume or makeup video, but maybe I'll ask for a video camera for Christmas.

Also, I don't think posting a Halloween tutorial just a couple of days before Halloween would help anybody.  But, I swear, my vampire costume was gonna be awesome.  And so was my Little Red Riding Hood.  And my Ancient Roman costume.  I'm sure you can imagine it.

Now onto more informative things.  Today I'm going to talk about chunky knits.  I know people who won't wear 'em, and I know people who wear them all the time.  I personally love chunky knits, and it's that time of year again.

There is a way to do chunky knits wrong for your body type, so I'm back with another "tutorial" on how to flatter your shape and still follow this fall/winter trend.  For reference, see part 1 and part 2.


{Rectangle Type 1}  Lucky you!  You can pull off almost any chunky look.  You look super cute in full sweaters or vintage sweatshirts/ponchos over skinny jeans, and you can work the horizontal stripes.  Pair with boots (and maybe some legwarmers peeking out from the top of your boots) and you've got a really trendy look.
Rectangle Type 1 - Chunky Knits


{Rectangle Type 2}  The best knits for your body type are open sweaters and chunky scarves.  Go with a bold-print scarf and a neutral sweater, or try a fun ankle bootie with rolled up jeans.  Also, stay warm with the trendy floppy-brimmed felt hat or a knitted beanie.

Rectangle Type 2 - Chunky Knits


{Apple}  Since you have a narrower waist and a broader top-half, minimize on top and accentuate on the bottom.  Choose sweaters with more volume towards the lower-half, and try a plain t-shirt tucked into a pencil skirt.  Wear some fun tights and boots, and accessorize with a cute hat.


Apple - Chunky Knits


{Pear}  Since you have a fuller shape lower down and you get narrow towards your shoulders, wear chunky sweaters and scarves that add volume to your upper half.  Pair with bootcut jeans and boots underneath.  Tucking skinny jeans into boots may work for you, but for most pear shapes it can over-accentuate your fuller hips.
Pear - Chunky knits


{Hourglass}  Play up your narrow waist with a belt or a sweater that nips in at the middle.  Pick some cute knee-high boots and tuck in some skinny jeans, or try a funky ankle bootie.


Hourglass - Chunky Knits


That's all for today!  And as I've said before, these don't always apply to everyone.  Your body may not fall directly under these categories, but this is just a basic guide for you to have in mind.  Figure out how to play up your best features and camouflage the ones you may not like as much, and you're golden.

Have fun shopping for the cold weather!

-Caroline

Wednesday, October 19, 2011

Un-washing your hair

Caroline here!  Like I promised you, here's a post on how to wash your hair less and still look like a model.  (Or, you know, like someone with pretty hair.)

Let's just go ahead and get started!

{Step 1}
                Plan out a few days where you're not going to go anywhere special.  You're hair's gonna look pretty unattractive for a few days, but if you can manage to pull it back or cover it up with a hat, you're set. But the best plan is to do this when you've got lots of time at home.  

via


{Step 2}
Wash your hair thoroughly on the first day.  You need to remove every impurity possible!  So you can buy a clarifying shampoo if you want, but the best way to really get in there without damaging your hair is to use baking soda.  Make a thick paste with 2 parts baking soda and 1 part water and rub it into your scalp.  Really get in there with it, and then rinse with warm water.  Follow up by mixing one part apple cider vinegar with one part water, and rub it gently through your hair.  Rinse and style your hair as usual, but don't add any hair products.

{Hair Health Tip:  Don't use those same baking soda measurements if you have incredibly fine hair, or if you use this cleansing method daily.  Instead, use about two tablespoons of baking soda in a cup of water and just pour it over your hair and scrub.}

via

{Step 3}
Now here's the hard part.  You need to completely refrain from washing your hair for AT LEAST three days.  I recommend five, but that can be reaching for the stars for some of us.  No matter how nasty your hair looks, don't put anything in it!  You could use dry shampoo, but that could build up and end up making it look worse more quickly.  Just... don't touch!

via

{Step 4}
On the final day of your waiting, when it's been long enough and you just don't even want to think about your hair anymore, you're free to wash.  You might want to use the baking soda method again, but you can also just use plain old shampoo and conditioner.  

{Step 5}  
Now, wait three days before you wash your hair again.  It should be loads easier this time around already!

{Step 6}  
Wash that nasty scalp.

{Step 7}
Now, do what you will!  I trained myself to wash my hair two (occasionally three) times a week.  You could do it every other day if you're more comfortable with that!  But there's no way you can do either of these things without doing the hard part of living with the nastiness for a while.  My hair, now, doesn't get gross until the third day, which is my "pony-tail" day.  

I hope this helped you!  Once you start washing your hair less, your hair will be healthier and stronger.  Plus, you won't have to blow-dry and straighten it every day anymore, either!

Go forth and have awesome hair.

-Caroline

Friday, October 7, 2011

Hairapy

Hey, y'all, it's Caroline!

It's no secret that in order to have pretty hair, you have to have healthy hair.  You may have the longest, thickest hair in the land, but it can be wildly unattractive from the frayed, broken ends and the lackluster color.

So, what are you going to do about it?  Here are some tips on getting your healthiest hair yet.

  • Get your hair trimmed once every 4 to 6 weeks, even if you're trying to grow out your hair.  This cleans up split ends and fragile tips, and heightens the overall healthy appearance of your locks.  A trim doesn't have to remove much length at all.
via

  • Wash your hair less.  Yup, you heard me right:  LESS!  This probably freaks you out, because you're thinking about how oily your hair gets after even just a day without washing it.  Well, worry no more!  The reason your hair is this prone to oil is because every time you wash your hair, you strip it of its natural oils.  This causes all of that good stuff to come in too quickly and powerfully to compensate for all the oil you took away.  I only wash my hair twice a week, and by the time I wash it, it's only just starting to look dirty.  Next week, I'll be doing a post on how to pull this off, so stay tuned!

via

  • Let your hair down!  When you put your hair up with clips and pins and rubberbands, you're inevitably going to break some of your hair.  So try to wear your hair down more often, and if you need to "put it away" for a while, try braiding it loosely and securing with a no-snag hair band.

via

  • Never brush wet hair.  When you get out of the shower, use a wide tooth comb.  Start at the ends of your hair and gently work out the knots and kinks.  Try not to tug, pull, or yank at your hair.

via


  • Every once in a while, use a clarifying shampoo.  This reduces the amount of build-up in your hair so you can get a shinier look.  For people with color-treated hair, and also for people on a budget, use baking soda!  Make a paste out of two parts baking soda and one part water, and work it through your hair.  Rinse thoroughly, and follow with your usual shampoo and conditioner.
via


  • Keep off!  Try to use heat tools as sparingly as possible, and when you just must, please use a heat protectant.  Don't handle your hair too much throughout the day, because that will cause greasiness.  Also, don't put too much product in your hair or brush it too often!

Add caption


These are just a few thoughts on healthy hair, and I hope this all helped you!  Like I said, stay tuned for a post on how you can go days without washing your hair.

Have a great day!

-Caroline